
The problem
When designing an application, I had a problem with my fragments’ interaction. I decided to let my activity hold every information important to my Application, and let the fragments access those data directly via the Activity. The problem is that Fragments and Activities aren’t supposed to be that tightly coupled. A fragment is supposed to be independent from its activity lifecycle, and we’re going to see why…
Be careful with your Bundles.
Ok, just imagine that you have your Activity, that holds some API result information. This API information needs to be provided to all of your fragments inside your activity. No problem, you can create your fragment using a static method, pass the information you need via a Bundle, and use a callback to update the data as needed. It would seem rather easy, and is what Android Studio propose to generate when you create a new Fragment.
public static MyFragment newInstance(Shop shop) {
	MyFragment c = new MyFragment();
	Bundle b = new Bundle();
	b.putParcelable(MyFragment.SHOP_KEY, shop);
	c.setArguments(b);
	return c;
}
Note
A Parcelable object allows you to write and restore your data from a “Parcel”. This lets you serialize your data, so that it can be restored later.
It looks like a good solution, except you need to be careful.
A question that popped to my mind was whether or not using a bundle to pass some data between fragments and activities would return the same instance of your class. To test this, I decided to play with the Logcat and display the object.toString(), before and after passing it via a Bundle. As far as my tests went, the objects are of the same instance. So if you modify the object in your fragment, you won’t need to modify it in your Activity. If you’re simply changing a name it’s not really important, but if you’re adding an item to a list, you might want to note that.
You might also know that, depending on your activity’s/fragment’s state, your app might be killed. There’s a magical little method called onSaveInstanceState(Bundle), that allows you to save some data before getting killed in both your fragments and your activity, so that you can retrieve them later. It is for example called when you change your phone’s orientation, letting you save your state and retrieve it once the orientation is changed. So, now, imagine you’d want to save your data (let’s stay with a Shop example), into your savedInstanceState Bundle, you’d simply do the following:
@Override
public void onSaveInstanceState(Bundle outState) {
	super.onSaveInstanceState(outState);
	outState.putParcelable(MyFragment.SHOP_KEY, mShop);
}
And you’d be able to retrieve it in your onCreate as follow
@Override
public void onCreate(Bundle savedInstanceState) {
super.onCreate(savedInstanceState);
if(savedInstanceState != null) {
mShop = (Shop) savedInstanceState.get(MyFragment.SHOP_KEY);
}
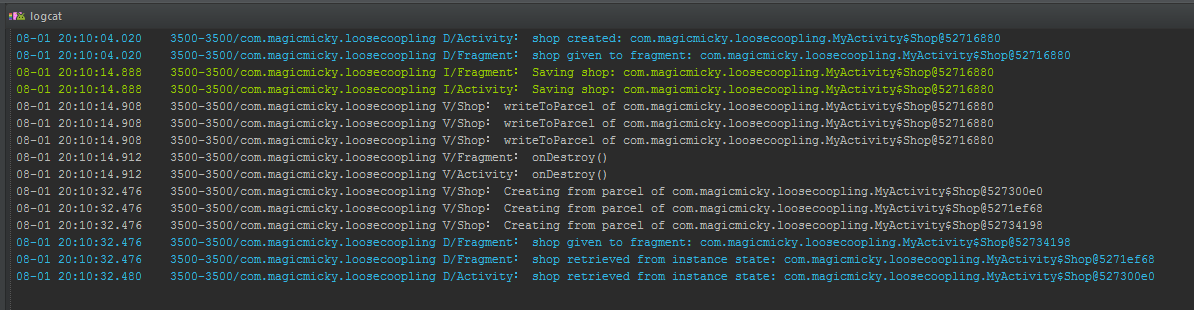
}Now, let’s assume that since you want your Shop to be saved in both your fragment and in your activity, you save your shop in both your activity’s onSaveInstanceState, and your Fragment’s. Do you think that after your app gets put on background and killed, the Shop contained in your activity and in your fragment will still be of the same instance? Well, no! Not only it isn’t the same instance as before (which seems logic, since your Fragment and Activity got destroyed), but the two Shops aren’t of the same instance at all! See the following logcat:

The Fragment even receives the Shop twice after the destruction of the app, once from the arguments (that it still holds), and once from the savedInstanceState that it saved earlier. And note that none of those are the same instance as the Shops from the Activity.
Now, let’s go a little further and see what’s going on. My Shop implements the Parcelable interface, which is supposed to help storing information temporarily in bundles. Let’s see when the system calls this interface. I simply added a few Log inside of the writeToParcel(), and the constructor which uses the Parcel to construct the object. And here is the Logcat:
So, as you can see, the calls to the writeToParcel() are only made when we are using onSaveInstanceState(Bundle). This means that depending on when you use a Bundle, the putParcelable() method don’t seem to behave the same way. Moreover, we can see that this is done 3 times: Two of them are from the Activity and Fragment onSaveInstanceState, and the last one must be from the Fragment’s getArgument’s one. This would explain why the Fragment is able to access getArguments(), even after it has been destroyed: the system must save the arguments Bundle, and restore it to give it to us later.
So it’s a bit enigmatic to me right now, when the writeToParcel() method is called. The Bundle implementation seems rather simple as it stores the Parcelable object into an HashMap. I suppose that it is called during the fragment Lifecycle, where the Bundle issued from onSaveInstanceState() would be store in a more persistant storage, using the Parcelable interface on the object from the Bundle.
So, ok we need to be careful while passing some data through a Bundle. We could say that instead of doing that, we’d simply use a Callback from a Fragment to the Activity, getting the Activity’s reference of our Shop, and always working with it in our Fragment. Once again, we need to be careful. If we look deeper to our logcat’s above, we can see that the fragment’s onCreate is called before the activity’s. This is confirmed by the documentation, that states that we need to wait for our Fragment’s onActivityCreated() callback for the activity to be created. So we would be able to get our data from our Activity only once the view is created, and populate it with our data by then. It might make our code look quite messy…
You can find the source code used to generate the Logcat on this gist.
The solution
The fact is that we need to loosen the links between our Activity and our Fragment. We need to be able to make a Fragment work, even if our Activity isn’t created, and still let our Activity know about our data updates. To do so, we need to focus on two thing: where to get the data, and how to send the updates of our model.
The first solution is pretty simple. We could just put our data into a SQLite Database, and retrieving it asynchronously in our Fragment. This is quite easy to achieve, and well documented.
For the other one, a design pattern called a BusEvent might interest us. To make it as easy as possible to understand, the BusEvent pattern let’s us define some event, that can be thrown toward a Bus, and will be delivered to every subscriber. This way, our Activity will be notified about any event it subscribed to, thrown by our Fragment.
This would allow us to, for example, to change the Shop’s name in our Fragment, change the information stored in the database, and once it’s done, simply send an event through our bus saying “Hey, to anyone interested, the shop has been updated”. Then, on our Activity, we’d simply subscribe to those kind of event on our Bus, and we would be able to know when the Shop has been modified. Then, we’d simply need to retrieve it from the database, and work with it.
Let’s briefly see how to use an event bus library on Android. The one I recently used is called Otto, and was made by the awesome people from Square.
Otto
Otto is a BusEvent implementation, based on Guava. It’s really simple to use, and well documented on square’s website. I’ll simply show you how to easily implement what I’ve been talking about up here.
First, we need to be able to have the same Bus instance, over our application. To do so, you can simply create a singleton bus:
public class BusProvider {
	private static final Bus BUS = new Bus();
	private BusProvider() {}

	public static Bus getInstance() {
		return BUS;
	}
}
Then, we can declare an event type. This will be the event thrown through our Bus, to notify of a shop name that changes.
public class ShopEvent {
	private final String mNewName;

	public ShopEvent(String newName) {
		this.mNewName = newName;
	}

	public String getmName() {
		return mNewName;
	}
}
We now need to make our Activity register to our Bus : just call BusProvider.getInstance().register(this), in your Activity’s onResume(), and BusProvider.getInstance().unregister(this), in onPause().
Then we define a method, with the @Subscribe annotation, and a single argument corresponding to our Event type.
@Subscribe onShopChangingName(ShopEvent shopEvent) {
	//do stuff
}
Now, everytime someone will send a “ShopEvent” event to the bus, our Activity will be notified. So, to send this ShopEvent, we simply need to use the post(Object event) of our Bus, with as argument, an instance of our ShopEvent.
BusProvider.getInstance().post(new ShopEvent("Caramba!"));
Once posted, every class that subscribed to the ShopEvent event type, via our Bus, will be notified of this new events!
Pro-tip:
There is an Intellij plugin for Otto. It allows you to go back and forth in the events posted by Otto. See here for more information!
I’ll leave you find a lot more example on how to use Otto, including otto samples, and its documentation. I hope this article helped you think about how to do in-app communication in Android. If you have any suggestion, question, or you think I forgot something, feel free to comment below! :-)
