
A few days ago, I struggled with a simple use case: in an Android Application, I wanted to show a simple tutorial item (displayed as a Card View), but only until the user acknowledged he knew how the app works.
To do so, I first decided to put this simple view in my layout with a visibility of GONE, and changing its visibility based on a SharedPreference item telling if the user knew how the app worked. This solution was simple enough, but I was wondering, wouldn’t it be bad for performance if we need to inflate a view that will never be shown?
So, the other solution I thought about was to inflate this view only when the user open the app for the first few time. This would require to do the inflation programmatically, which requires to call inflater.inflate twice, and might be even worse in term of performances.
I decided to ask it on StackOverflow, searching if some people might have looked into this before. As I waited for an answer, someone commented asking “What did you try?”, and I realized that this guy was totally right! I could try to use DDMS to benchmark the two different solutions, and see what would happen. So, this is what I did.
Brief presentation of DDMS
DDMS is the Dalvik Debug Monitor Server. It provides debugging tools that you often use (Logcat, thread and heap information…). The binary for DDMS is located in the tools directory of the SDK and can be launched using the ddms binary. it consists of a simple window showing you the different debugging tools.
The tool we will be interested in today is called Traceview. It allows you to generate some execution log using the android.os.Debug class, and seeing them graphically.
TIP
Add thesdk/toolsandsdk/platform-toolsto your PATH environment variable. See this post if you need help.
Generating your execution log
Generating your execution log is really simple, all you need to do is use
Debug.startMethodTracing("your_filename");
which will generate a file in /sdcard/your_filename.trace. And don’t forget to stop the method tracing:
Debug.stopMethodTracing();
Reading those log
First, you’ll need to retrieve the tracelogs files from your phone to your computer. You’ll just need to execute a adb pull /sdcard/your_filename.trace ..
Once you have the log files, just launch the monitor binary, located in the tools folder of your sdk. You’ll then be able to open a file (file > open file). Then, that’s it. You’ll have your trace log opened on your computer, ready for you to analyse it.
Back to the issue: visibility changes vs java inflation.
I’ve created a simple Gist showing the project I used to generate the logs I will try to focus on in this post. It simply start the logs in the fragment onAttach(), and stops them in the fragments onResume() You can find the log I generated with this post here.
So, let’s think about our problem. First what do we want to focus on? Since the view is most of the time hidden, we want to focus on the time performances when inflating the layout, without showing the tutorial view. But, since we don’t want to discourage the user on first uses, we still want a fast inflation speed when we display the view.
What we’ll ask here is, would it be a good idea to switch from the first solution (inflating a layout with some GONE views), to the other one (inflating only what’s important, and adding the tutorial view when we need to).
Displaying the view
So, let’s first compare the performances when we display the tutorial item.
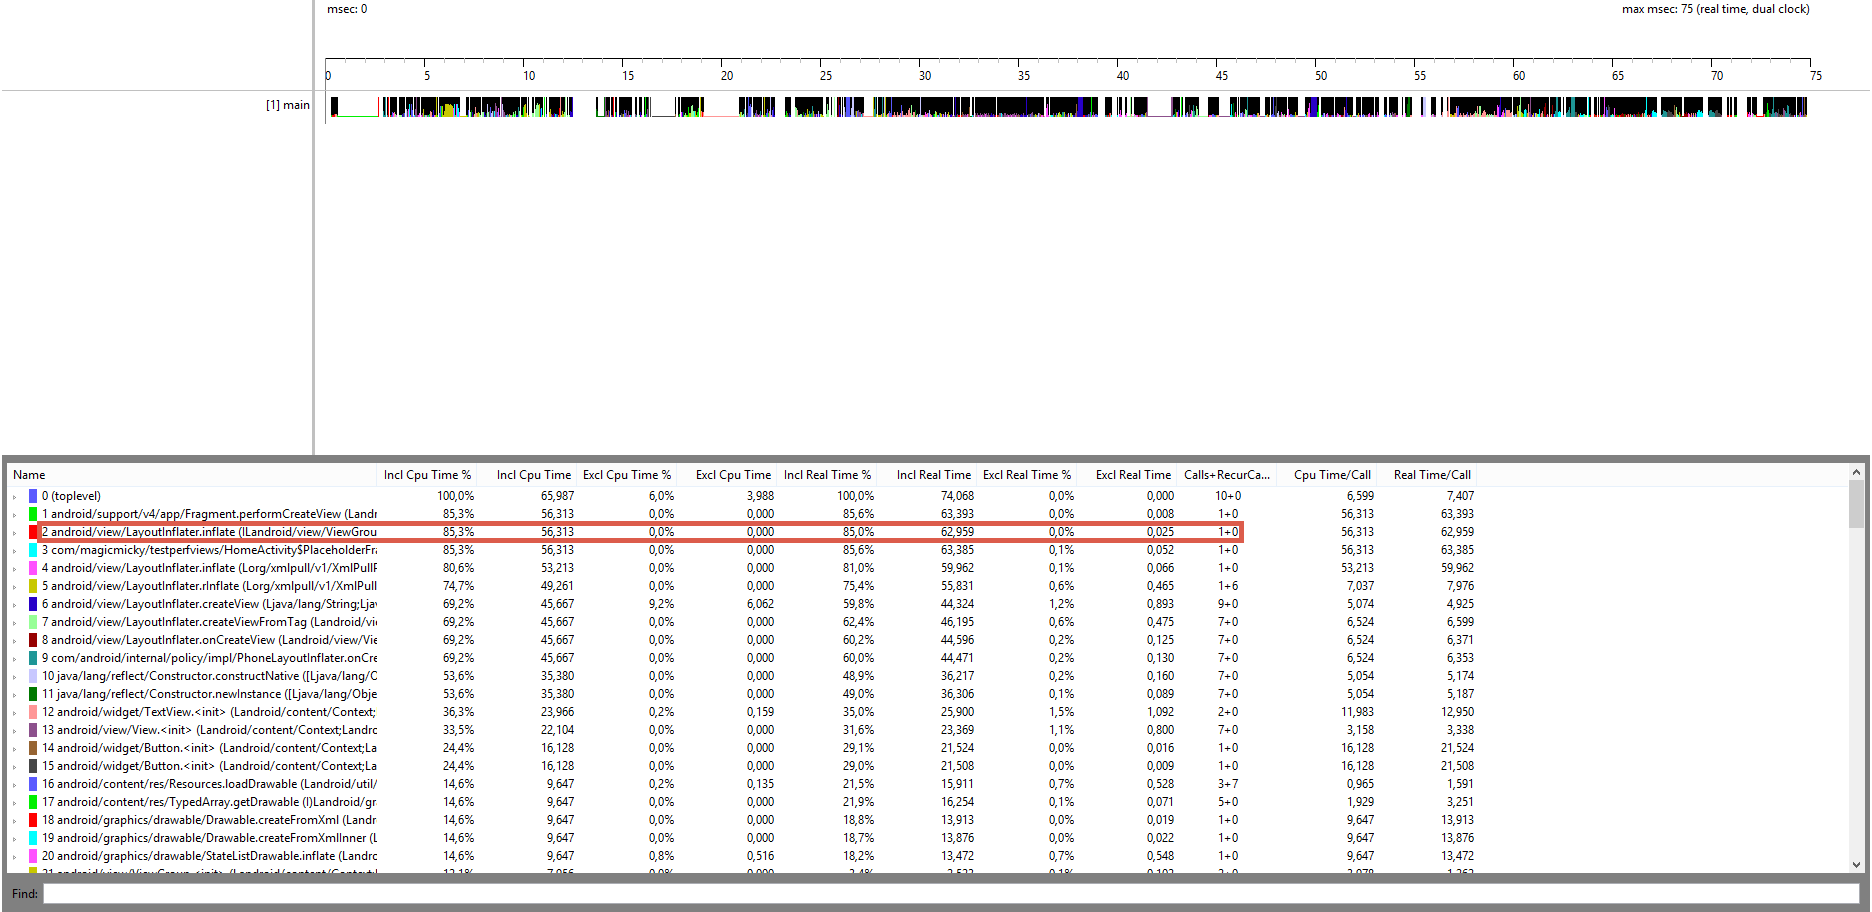
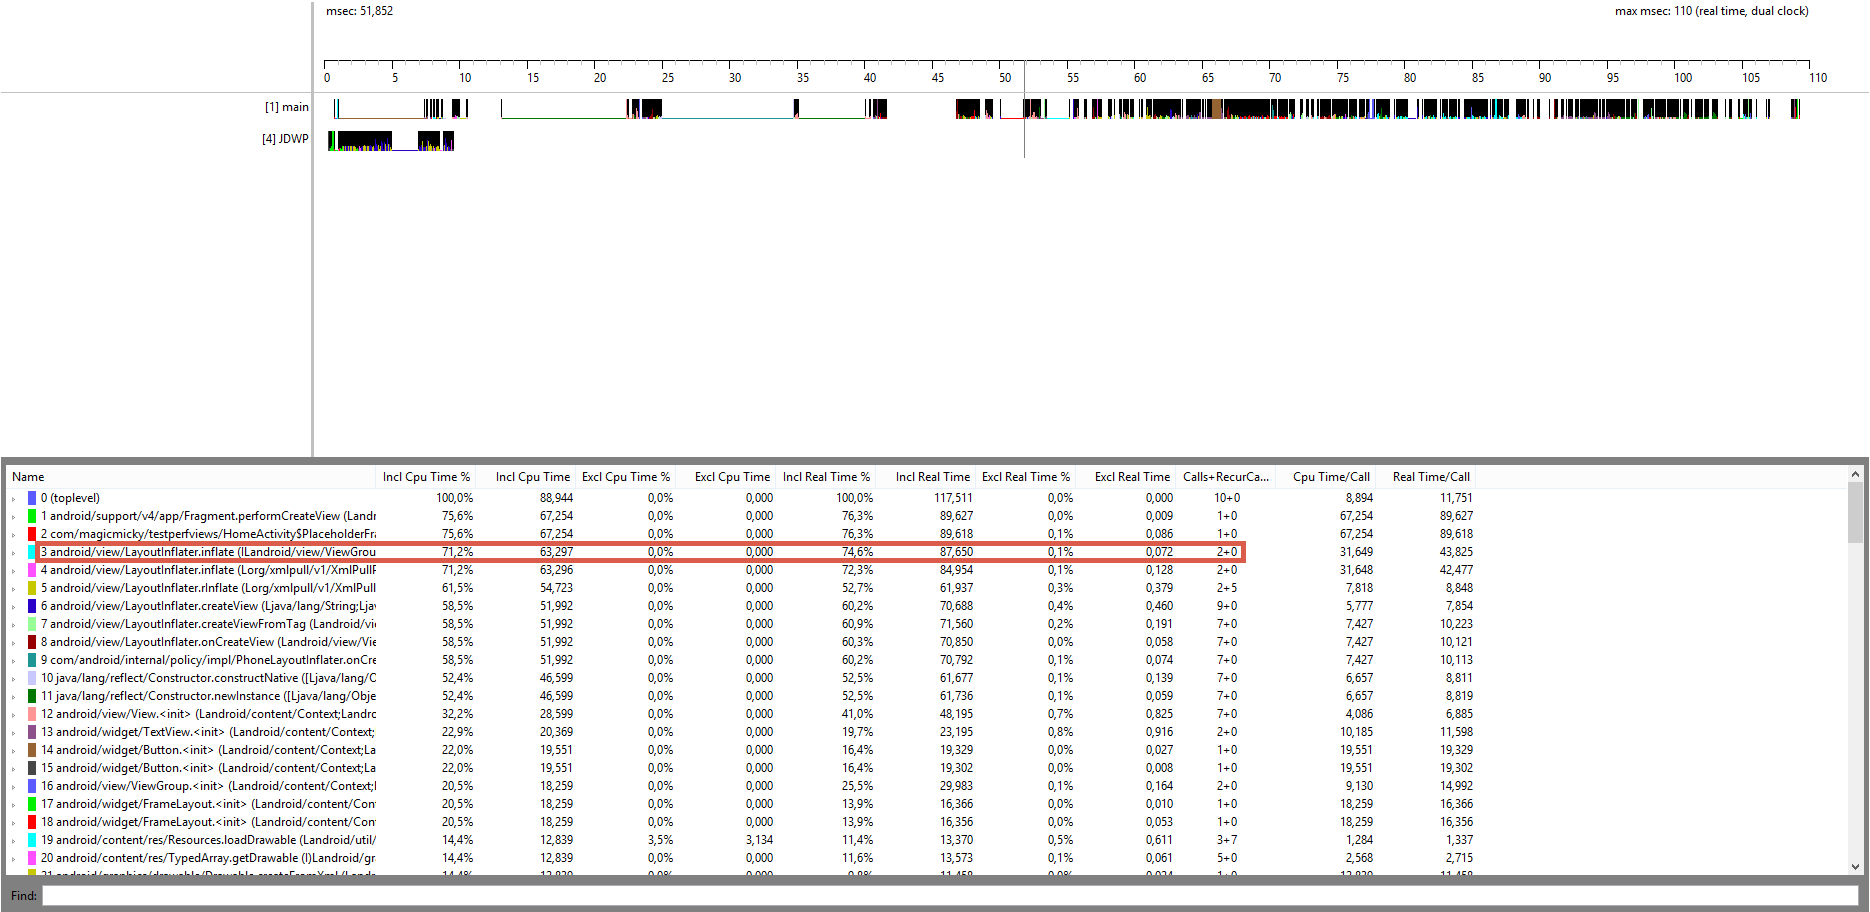
The first image represent the log file for when we simply change the view’s visibility from GONE to VISIBLE. The second represent the log file when we inflate the view programmatically in the fragment’s onCreateView. As we can see, the two log files look a little bit the same, with a smaller exec time (max msec), in favor of the first one (75msec vs 110 msec). From the Profile Panel, we can see the spare call to LayoutInflater.inflate() when inflating the view programmatically, which takes up some precious time (highlighted in red on the screenshots).
So, switching from the first method to the second would decrease our inflation speed of about 31%.
Hiding the view
From the logs, this is what we can see:
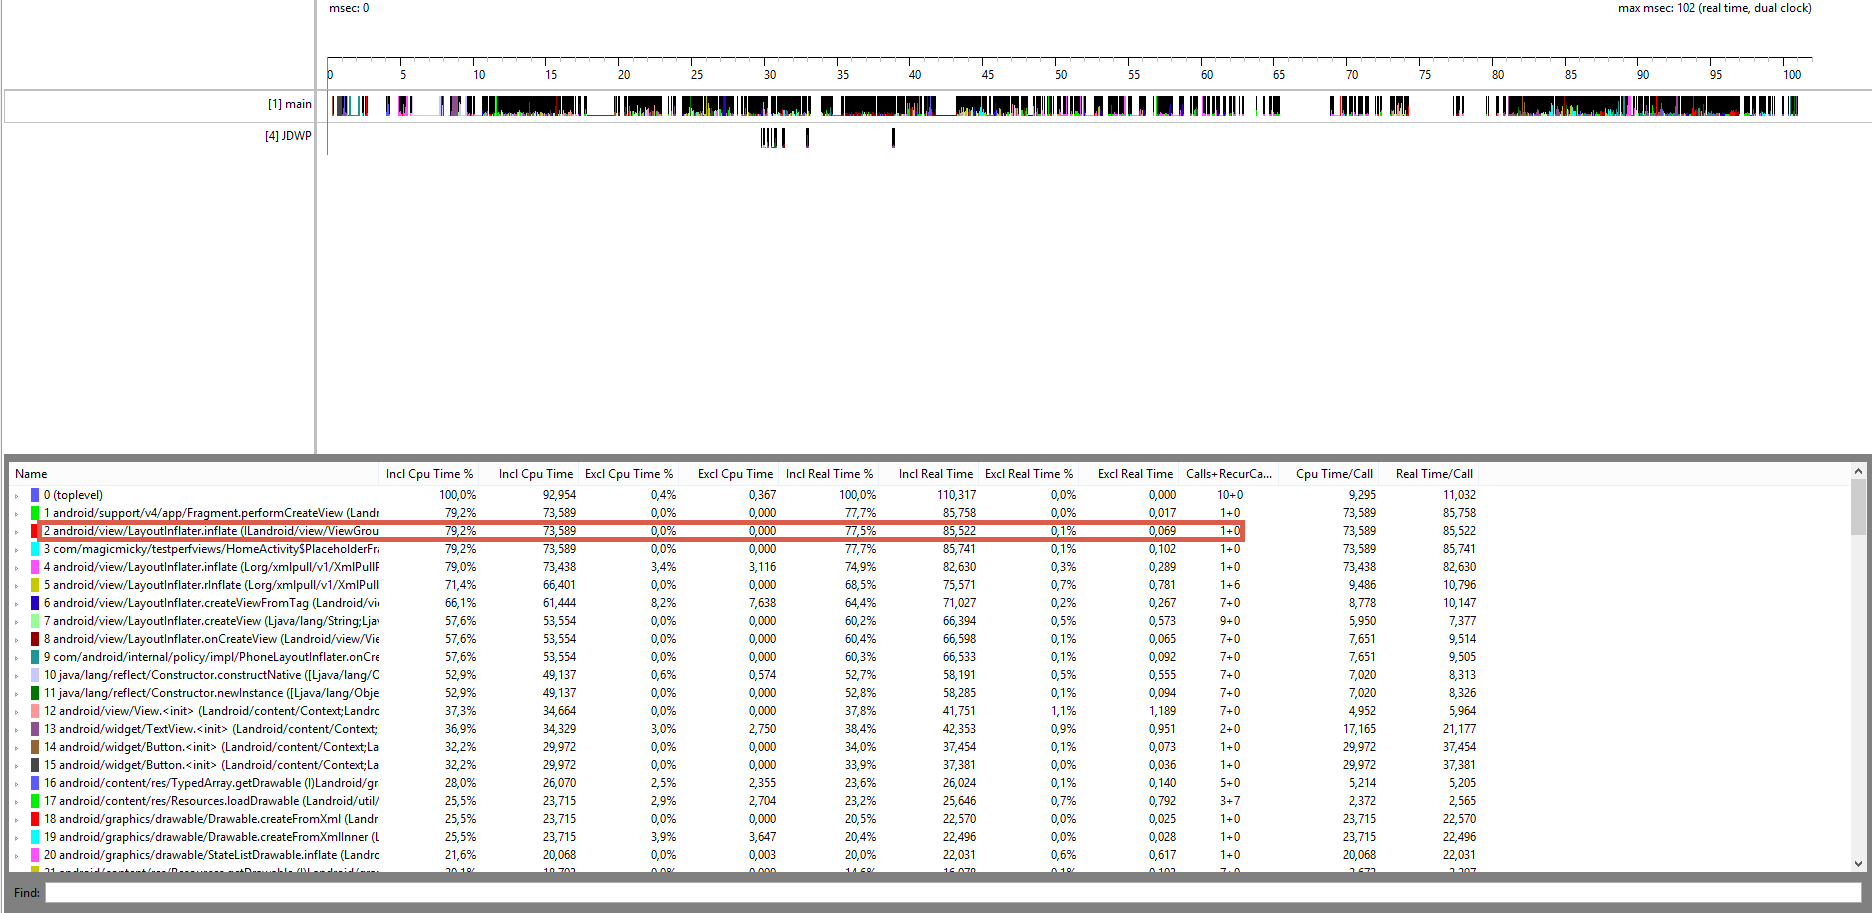

From left to right: the representation of the log file when we inflate the layout containing the GONE view, and the representation when inflating the view without the tutorial view. So, as expected, inflating a more complex layout, even when some views’ visibility are set to GONE, takes more time than inflating the simpler view, without the hidden views. What I didn’t expect was the ratio of almost 1:3 for the execution time (102msec vs 39msec). Yeap, the inflated view was a bit complex, but still, I didn’t think letting it to GONE would be that bad for performances when inflating the layout.
So, switching from the first method to the second one would increase our inflation speed of about 161%. Yay!
Note
We need to note that here, the layouts used are really simple. This explains why the speed increase are that important.
Conclusion
So, to conclude about this, inflating a layout with some views with a visibility set to GONE is bad for performances, especially if the view is a bit complex. If you don’t want to show this view verry often, I would suggest you to create a separate xml file containing your view, inflating this layout when needed, and adding it to your main layout programmatically.
I hope you learned some stuff, and if you feel that you can add some information in here or that you don’t understand something, feel free to comment this post or to email me !
Edit
As said in comments, a simpler way to manager this kind of view would be to use ViewStub. It allows you to inflate easily a view when needed, without doing it programmatically. This article is here to explain how to easily use TraceView to test your app’s performance, and let people know that inflating views which will stay asGONEforever is bad!
